When I purchased The Land, the parcel was a 1400 X 2100 foot rectangle of unimproved land. By unimproved, I mean there were no structures, no ponds, a small game/RV trail, that divided the land unevenly, was the only path and no signs of agricultural use or forest improvement could be found.
Beyond knowing, from my pre-purchase and subsequent walks, that the property had my desired features of easy access, potential pond site(s) and an old field succession forest, I knew very little about the property and very little about the exact location of the various features on the property. I knew I wanted to build roads and trails to give general access to the property. I knew I wanted a pond and I knew I wanted to build a barn/cabin space. In other words, I knew what I wanted but I was very short on knowledge like where and how.
I tried walking around with a compass to locate myself and some of the features, but quickly became frustrated by obstacles to my line of sight, measurement and simply finding my way back to the same spot on a different day. I needed a way of placing myself and certain desirable features in an exact location on the property. My solution was to map the property by putting stakes in the ground. This is 20+years ago, before GPS, and Google maps.

Josh
The first thing I did was to mark the boundary lines of my property clearly with blazes on three sides, the county road marked the 4th, as described in the previous post. Next, with the help of my son, who like my other children, has always been willing to indulge my obsessive nature, I created a grid layout for the property. To do this, we first made about 150 stakes out of 2 X 2’s. Each stake was about 4 feet long, sharpened on one end and painted orange on the other. The orange end was marked with 2 numbers after it was placed; the distance

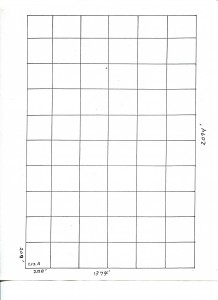
The initial grid created to map the land. Each square is 200 feet by 200 feet.
into the land on a south north access and under that number the distance across the land on the east west axis. So a stake labeled 400/600 was 400 feet north of the southern boundary (the county road) and 600 feet west of the eastern boundary (my neighbor’s field). Then using a rented surveyor’s wheel, Josh and I, walked the entire east boundary putting a stake at 200 foot intervals. We then walked each 200 foot increment east to west putting a stake every 200 feet. Each stake was numbered as above. On the picture to the right, the first intersection in the lower right corner was 200/200. The last intersection in the upper left corner is 1800/1000. Once this was done, we could easily locate any spot on the property and begin to

Sample of Initial Noyes
draw a map of the property and its features.
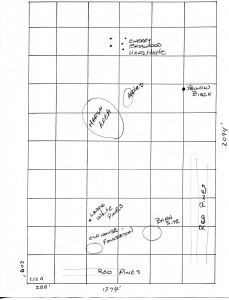
The map at the left is similar to one of the first maps I made showing the location of the marshy area with low lying shrubs, reeds, and ferns that became the field that drained into the first pond we dug and proposed locations for the first structure. You can see, I noted points of interest like the location of trees of particular interest or value and stands of a particular variety. You will note those things of interest to you and those features that get you closer to your goals.
Today, there are many different tools that are available to you on the internet like Google Maps and there are some shareware products that help with creating the types of maps that I did by hand. I like, use and see great value in technology but I am far from an expert so I am not going to offer any recommendations just one suggestion since I found these articles helpful in understanding what is possible. If you are interested you can find the articles here.
One final thought. I understand that my stake and grid method of mapping my property is labor intensive compared to computer generated maps. However, in the process of doing the mapping, I really got to know my property on a very intimate level. To this day Josh, who likes to walk the property barefoot, says he can tell where he is on the property by the feel of the ground under his feet. I believe him.
