Mistakes and Other Regrets in the Design Process

As the new year begins, many people’s minds turn to the coulda, shoulda, wouldas of life.  Like most people, my mind follows similar directions but when it comes to Landscape Design, I think my entire process is riddled with coulda, shoulda, wouldas.  I find myself constantly saying if I had known this or that, I would have or I would not have.  While there is absolutely no way to completely avoid the shouldas, learning, studying, observing and in depth planning can help to avoid some, if not most of them. Below are some of my thoughts for someone entering the design or redesign process today.

My first thought is PERMACULTURE.  Back in the early 1990’s when I was making the initial plans for The Land, permacluture was in its infancy and I knew nothing about it.  I learned about it, from a friend,
My Permaculture Guru

My Permaculture Guru

when discussing with him how I wanted to make a vacant field on my property more productive.  Permaculture is a very large topic and encompasses many ideas from the designing of communities for efficiency and sustainability to using plants in combinations, called guilds in permaculture, to make them more productive, disease resistant and sustainable.  If I had known more about permaculture principles and design:

  1.  I would have thought more about the space where my barn was placed.  While I had the equipment here to clear the spot, I would have cleared a larger area to create space for a future garden, chicken coop and composting area.
  2. I would have positioned the barn on a different axis to allow for better capture of sun and wind for renewable energy production.
  3. The pond nearest my barn would have included both the elevation and piping to filter and use water from this pond in my house and garden areas.
  4. When I prepared the barn for living, I would have plumbed it to separate grey water from sewage to better us this valuable resource.

My second thought is soil fertility and food production.  When making my first decisions about meeting my goals for The Land, my efforts were focused on accessibility, timber production and recreation.  In the process of meeting these goals, I paid very little attention to soil fertility and crop production.  A big mistake.  My excuse is that my dreams of living at the property and having the time to tend to crops were well off in the future. Looking back, there were many things I could have done to enhance soil fertility and food production while building roads and ponds.

What I could have done differently:

  1. I could have saved more of the top soil, moved to create roads and ponds, and moved it to locations I might want to plant in the future.
  2. I spent a great deal of money and time trying to get species of lumber trees absent from The Land to grow.  Most of these planting failed because of environmental conditions and my lack of understanding of what different species need and experience. Looking back, I believe this money and effort might have been better spent developing hedge rows of fruit and berry producing shrubs that would today be feeding people and providing shelter and deer barriers for future plantings and gardens.
  3. I would have planted the fields and open areas, I created, with nitrogen fixers and mulch producing plants that would have built soil and stopped erosion.

I don’t believe that any plan is perfect, nor can all mistakes be avoided.  Everything we do on our property and in life are functions of who we are at the time and the resources available to us (time, money, tools, etc.). However, a lot of mistakes can be avoided by taking more time in the planning process and taking the long view, considering what you might want to do in the future and allowing for those posibilities.

This is meant to encourage a new land owner or someone who owns land and is at a place where they want to develop it, to do the homework.  Observation and education can be more productive in the early stages of development than perspiration.

The side bar of this website has a few links to websites I have found helpful and books that are good at getting the imagination started and talk about what is possible. Here is a fun TED talk that I think provides an introduction to the idea of Permaculture and its possibilities.


Continuing the Design Processs

In a previous post, I described the grid process I used to get to know my land and to locate specific features and identify areas for future projects.  This post describes how I used that grid process to place roads and ponds.

Today there are many on-line tools to  help with the process of making maps of your property.  I mentioned this tutorial in a previous post as a good jumping off point for those who want to learn how to use those tools.  It can also be done by going to your local soil and water district and making copies of the maps that show the features of your property.  This is how I did it 20+ years ago.

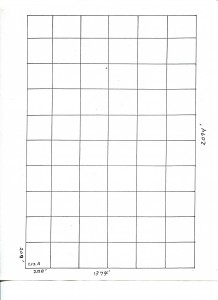
From this information, I created soil type and topography overlays for my grid map of The Land.  The first map pictured on the left is the grid map I created and used to begin to

The initial grid created to map The Land.  Each square is 200 feet by 200 feet.

The initial grid created to map the land. Each square is 200 feet by 200 feet.

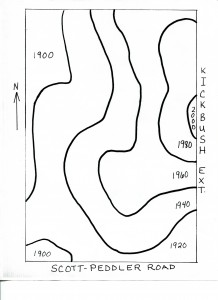
understand and place particular features of The Land in their proper relationship to one another.  Next, I created a topographical map of the The Land, which is shown on the right below.  This map was very helpful in the placement of roads and ponds.  I used a piece of overhead projector, remember those, film to make an overlay which could be placed over the grid map.  I then did the

Topography of the land.

Topography of the land.


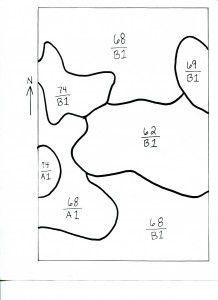
same with the soil map, below left, I made, again, from maps and information available from the soil and water district office.  Using the grid, topography and soil overlay maps, I could now begin to see areas where the soil type and incline were favorable for pond sites and roads.

Soil Zones on The Land

Soil Zones on The Land


The process I used for locating areas for ponds was to look at the topography map and find places where the slope of The Land and the topography lines indicated the potential for water pooling.  Soil was not a great concern since most of The Land’s soil is deep clay under a foot or so of gravelly top soil, great for pond building, not so great for gardens and crops.  I found three spots that looked the most promising, the south west corner, the south east corner and a third spot, kind of central west.  Take a minute and study the topo map and you will see what I am describing.

Once these identified pond sites were located virtually, I went out and walked the sites.  I ruled out the site in the south west corner for tree reasons.  First, it was closer to the road than I wanted. Second, the general area was fairly flat, as indicated by the increasing distance between the topo lines, and would have required a lot of dozer work to make a good drain field, increasing costs.  Third, a pond on this site would have required taking down a stand of red pine and some of the larger white pines on the property. The south east site had very good slope, some tree work would be involved to clear the site but no stands of quality saw timber or unique species would need to be sacrificed to create the pond and field.  The distance to the road was acceptable.  The third site in the central west area had a great slope for creating the field and pond area.  It was centrally located, private, and best of all required very little tree work.  The area was dominated by low shrubs, ferns, and hydrophytic (water loving) plants.  It was a no brainer to utilize this site for my first pond.

Locating the sites for roads was a similar process but instead of looking for drainage areas I sought to follow the contour lines as much a possible to avoid, as much as possible, creating roads subject to wet spots and erosion.  This was not completely possible because I also wanted the roads to give me access to all areas of the land to make logging, forest improvement and walking easier.  Again, once the sites were identified virtually, I walked the “roads” and routed them around significant trees and features I wanted to preserve.  I used flagging tape to mark the roads so the dozer operator would have a path to follow when building the roads.

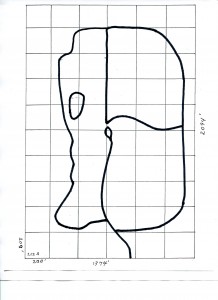
Roads 1

The map on the left shows the end product of the site selection and flagging.  All the roads shown on the map are large enough to drive with a pick-up truck or tractor.  This gave me general access to all areas of The Land with the equipment necessary to do forestry projects, like forest improvement and firewood collection, and to maintain the roads.

I then located and hired a construction company with experience in road and pond construction to come in and build the pond and roads.  This was not cheap, but very important because I wanted my roads and ponds built correctly so they would last and be built to the specifications necessary to meet local ordinances.

A couple thoughts on ponds.  In some areas, there are size limitations on ponds.  Most of these deal with the amount of water that can be retained behind the dike.  Some local ordinances require that architectural drawing be made to ensure a dike of sufficient strength to hold back the water.  Your local government and soil and water district can be very helpful with this.  Before the pond was dug, I had a representative of my soil and water district do a site visit.  This was very helpful.

A couple thoughts on roads.  Roads need to follow contour lines as much as possible to avoid erosion problems and boggy, impassable roads in spring and wet times.  Roads should also be dozed down to the hard pan which requires taking off all the top soil.  This creates roads that are “hard” and therefore less susceptible to ruts and erosion. However, it does create a great deal of brush.  A skilled dozer operator will be able to mitigate the “mess” by using techniques like burying some brush and creating contoured piles that over time will become less visible as they are covered with grasses.  Because of the woody nature of these piles, they become fertile ground for berry bushes, a nice treat when out for a walk.  A skilled road builder will also pitch the roads for better drainage.  Except for the main road on The Land, the road from the county road to the circle at the head of the field that drains into the pond, I did not add any gravel or surface topping to my roads.  Over twenty years later my roads remain solid, drive-able and the piles and scars, caused by building them, are only noticeable to those who know what to look for.

Planning takes a lot of work.  It took us most of the first year of ownership to make this plan and, as I will discus in a future post, I wish I had done more.


Beginning the Design Process

When I purchased The Land, the parcel was a 1400 X 2100 foot rectangle of unimproved land.  By unimproved, I mean there were no structures,  no ponds, a small game/RV trail, that divided the land unevenly, was the only path and no signs of agricultural use or forest improvement could be found.

Beyond knowing, from my pre-purchase and subsequent walks, that the property had my desired features of easy access, potential pond site(s) and an old field succession forest, I knew very little about the property and very little about the exact location of the various features on the property.  I knew I wanted to build roads and trails to give general access to the property.  I knew I wanted a pond and I knew I wanted to build a barn/cabin space. In other words, I knew what I wanted but I was very short on knowledge like where and how.

I tried walking around with a compass to locate myself and some of the features, but quickly became frustrated by obstacles to my line of sight, measurement and simply finding my way back to the same spot on a different day.  I needed a way of placing myself and certain desirable features in an exact location on the property.    My solution was to map the property by putting stakes in the ground. This is 20+years ago, before GPS, and Google maps.

O

Josh

The first thing I did was to mark the boundary lines of my property clearly with blazes on three sides, the county road marked the 4th, as described in the previous post. Next, with the help of my son, who like my other children, has always been willing to indulge my obsessive nature, I created a grid layout for the property.  To do this, we first made about 150 stakes out of 2 X 2’s.  Each stake was about 4 feet long, sharpened on one end and painted orange on the other.  The orange end was marked with 2 numbers after it was placed; the distance

The initial grid created to map the land.  Each square is 200 feet by 200 feet.

The initial grid created to map the land. Each square is 200 feet by 200 feet.

into the land on a south north access and under that number the distance across the land on the east west axis. So a stake labeled 400/600 was 400 feet north of the southern boundary (the county road) and 600 feet west of the eastern boundary (my neighbor’s field).  Then using a rented surveyor’s wheel, Josh and I, walked the entire east boundary putting a stake at 200 foot intervals.  We then walked each 200 foot increment east to west putting a stake every 200 feet. Each stake was numbered as above.  On the picture to the right, the first intersection in the lower right corner was 200/200.  The last intersection in the upper left corner is 1800/1000.  Once this was done, we could easily locate any spot on the property and begin to

Sample of Initial Notes

Sample of Initial Noyes

draw a map of the property and its features.

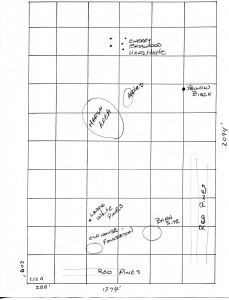
The map at the left is similar to one of the first maps I made showing the location of the  marshy area with low lying shrubs, reeds, and ferns that became the field that drained into the first pond we dug and proposed locations for the first structure.    You can see, I noted points of interest like the location of trees of particular interest or value and stands of a particular variety.  You will note those things of interest to you and those features that get you closer to your goals.

Today, there are many different tools that are available to you on the internet like Google Maps and there are some shareware products that help with creating the types of maps that I did by hand.  I like, use and see great value in technology but I am far from an expert so I am not going to offer any recommendations just one suggestion since I found these articles helpful in understanding what is possible.  If you are interested you can find the articles here.

One final thought.  I understand that my stake and grid method of mapping my property is labor intensive compared to computer generated maps.  However, in the process of doing the mapping, I really got to know my property on a very intimate level.  To this day Josh, who likes to walk the property barefoot, says he can tell where he is on the property by the feel of the ground under his feet.  I believe him.